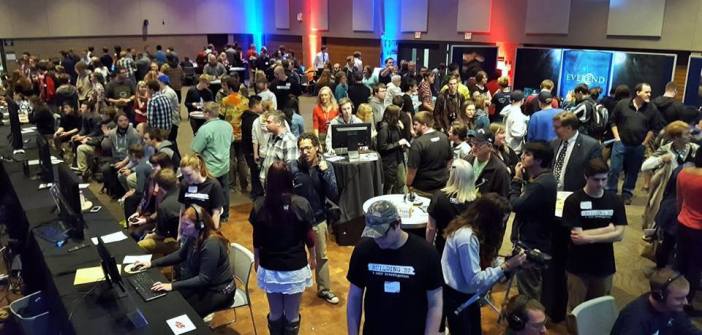
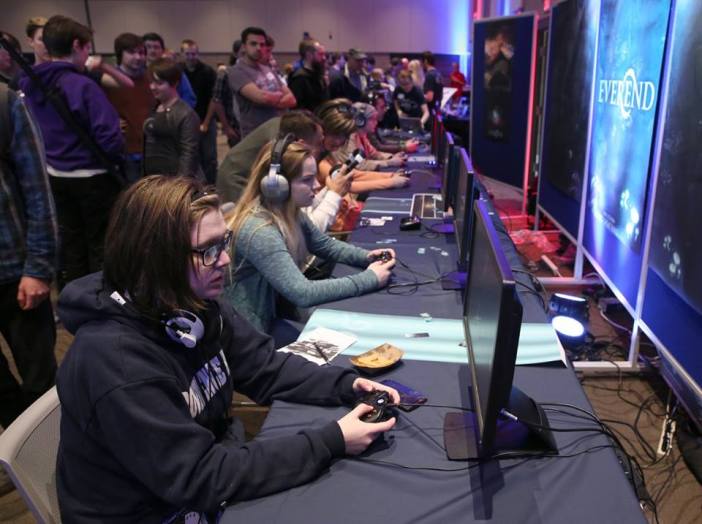
After working for a long year, running into road bumps, problems, and difficulties along the way, our game has finally hit the show floor! On Wednesday, we attended the Stout Game Expo, where all of the Game Design students at Stout showcase the games they have been working for the past few months. We were blown away by the attendance! Just look at all of these people!
If you look over to the right, you can see our display.
And here’s a closer look! We had an incredible turnout and quite a lot of positive reception. Many people were interested in our game, and we got to talk to lots of people and share a few of the experiences and wisdom we had garnered creating the game. We were even voted to be the best 3D game of SGX! Overall, I’d consider it a huge success!
That being said, it’s been a long year but we’re finally getting ready to wrap up…
Well, not quite yet. Right now, we’re currently at GlitchCon to show off our game. Unfortunately, it’s too late to purchase tickets, but if you’re attending please be sure to look for us!
Additionally, and perhaps more relevantly, we’ll be appearing at the School of Art and Design Senior Show on Friday May 6th! The show runs from 5pm to 9pm and will showcase senior projects developed through the semester, including our very own Everend. If you missed us at SGX or would like to see it in an even more polished state, be sure to visit us at the show! Attendance i
It’s been a long year of work, but the entire team is extremely proud of the game Everend. We’ve poured our hearts and souls into this game and we are ecstatic that the game had such a warm reception! We cannot wait to see what opportunities we’ll have in the future, whether it be further showings at conventions or eventually further developing our game. We look forward to seeing what heights our game soars to!
There may be more news to come as May rolls around, so we’ll see you around then!
So now that we are nearing the end of the game and all the animations have been complete it comes down to polishing. That requires a lot of play testing and attention to detail. Just because an animation is complete doesn’t mean it is done. You can always improve upon an animation. It is critical that you go over everything you animate before you send it off with your stamp of approval. Its essentially proof reading your paper before committing.
Animating a short film has a different approach then creating looping animations. For example if I were to create a cut scene animation everything would be controlled by me and the user wouldn’t have a chance to break anything because they wouldn’t interact with it. However when creating animations for a video game you have to deal with transitions. Good transitions are something you won’t notice, its a difficult thing to accomplish. The way I went about making this more manageable was to have a default pose which I used at the beginning of all my animations so once the animation was finished it would go right back to the default pose and move on to the next animation with no one noticing the transition.
A lot of the times what may seem like a good transition in maya might not look that good in unity. Mainly because it all comes down to user input on the controller. If you have an animation being spammed over and over it might not look as you wanted it to. This happened with Kaia’s first jump animation. I had the wings flap for the initial jump and then flap again on the double jump. However when you played the game it felt as though she was flailing about to much and did not look how I wanted it too. I ended up changing it so that she only flaps on the double jump. This ended up with me changing the animation entirely but there are some transitions that don’t require such drastic changes. For example the animation between the jump and the glide was not fast enough. Luckily there is a lot of control unity can give you to help out. You can tell unity which frame of your animation you want to start at and adjust the speed of the transition itself. With a little fine tuning and number changes we ended up blending multiple animations much better through the character controller.
I think the most difficult aspect of the the whole project would have to have been understanding how the transitions were going to play out in the game. Attention to detail and communicating with the the programming team helped a lot from where we were to where we are now. Another difficult aspect that many animators start out having trouble with is giving your animations a soul. What I mean by that is you have to give it a little extra something that makes it unique. There are many generic walking cycles out there but if you don’t give it that extra quality that defines what kind of walk cycle it is you’ll be missing out on your overall goal which is to give the character life and I think that is what it is all about. Animation is creating life.
As developers and designers of Everend, we have made many design decisions throughout Everend’s development. Deciding that we wanted the main character to be an owl was one of the first and biggest decisions we had to make, and that decision held true throughout the whole development of the game. But the thing is, there are many decisions made that were either scrapped or changed throughout the development process as well. Some of the biggest changes we have made have even involved some of our core game-play mechanics. For example the mole and the push-able rock have gone through plenty of these changes, both of which I will touch on below.
When we were figuring out what kind of puzzles we wanted to add to Everend, we came up with the idea of using a simple mechanic like pushing around a rock. We then added other mechanics to it in order to make those puzzles more complex. Simple right? Well, that didn’t turn out to be the case. The functionality that a rock was able to be pushed was never really the issue that we dealt with though, the issue that was dealt with was that we never really liked how it felt when pushing the rock. What I mean by this is that we changed how the controls worked while pushing the rock several times, but we kept the basic functionality of pushing the rock the same.
Kaia is determined to push this rock.
It may not always be easy to make a decision that changes the development process, but sometimes these decisions are necessary in order to make the game better overall. I know that we all are happy with results of all the iterations of the pushing rock controls, so it was all worth it in the end.
As mentioned before though, the pushing rock was not the only thing that changed through our development process. An even bigger decision that we made was changing how the mole would react to the player. As the pushing rock was more of a controls change, the decision to change the mole was a complete game-play change.
Uh Oh… Kaia, I think you should run!!
Originally the mole was designed to run away from the player when they would have a lit torch and it would move towards the player when the they didn’t have a torch. After creating the prototype of the mole we realized that there just wasn’t enough game-play involved with the current version of the mole so we decided to make a change. The new mole was designed to perform a charging attack when it is angered by a torch. The mole will then stay on the attack until the player figures out how to defeat it. And that is for you the players to figure out. 🙂
Overall, many decisions have been made and changed throughout the whole development process. Whether these decisions were made to cut, add or change things in the game, we have almost reached the end of the development process and it has been full of hard decisions that have shaped Everend in many different ways. We can’t wait to let these decisions be shown in full to everyone when Everend is released.
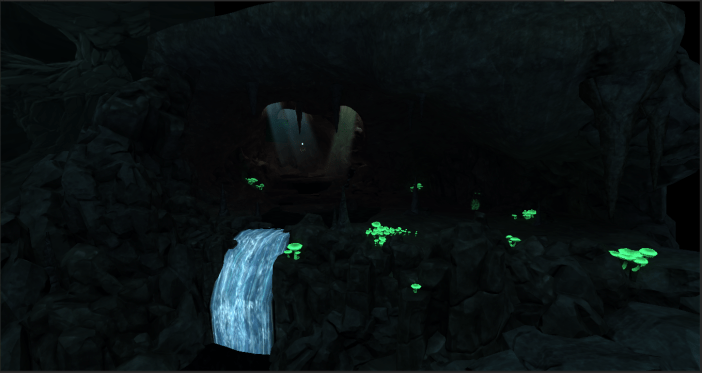
Its crunch time here for Strix Studios! Every member on our team has been working overtime to make sure we hit every deadline from here on out. Personally, I have dove head first into creating the particle systems in Everend. A particle system is a technique in game physics, motion graphics, and computer graphics that uses a large number of very small sprites, 3D models, or other graphic objects to simulate certain kinds of fun phenomena. Some of the particle systems currently in Everend is fire on the pedestals and Kaia’s torch, Kaia’s bubbles, ambient spores, waterfall foam, and a glorious glow (work-in-progress) for if Kaia missteps onto a dangerous area. In the future we plan to implement electricity on the eels, and ambient particles unique to each area.
In addition to official release dates coming soon, we are also preparing for some public events where we will be able to show off our progress. Here is some information about where our game will make appearances around campus.
Every year, Stout hosts the public Stout Game Expo (SGX) where all the UW-Stout Game Design and Development students get to reveal the games they have been working on. The SGX invites you to play 30+ free games at their annual gaming event. The games were created by freshman, sophomore, junior and senior students on platforms ranging from PC and mobile to virtual reality.
This Game Expo is a great opportunity to see the creations of other game designers and show off your own. Plus hundreds of people including friends, family, faculty, and public, show up to see everyone’s progress.
We had the pleasure of announcing Everend at Game Launch last semester, but we are very excited to finally reveal it at this year’s Stout Game Expo.
SGX this year is scheduled for April 27th in the MSC Great Hall from 6 to 9 p.m. We hope to see you there!
Another exciting opportunity we get to participate in is UW-Stouts Senior Shows. UW-Stout’s School of Art and Design will wrap up the semester with several special events May 6, in the Applied Arts Building and adjacent Micheels Hall atrium and Furlong Gallery.
Designs and artwork by 89 graduating seniors will be on display from 7 to 9 p.m. during the annual Senior Shows. Individual and group student work can be seen throughout the Applied Arts Building.
The event is open to the public, with a special showing for industry professionals from 6 to 7 p.m.
Everend will have an awesome themed booth so make sure you come see that as well!
We hope to see you at these really great events, but if you are unable to attend, we will continue to post weekly updates here on our blog site. Also we hope to have an official release date very shortly!
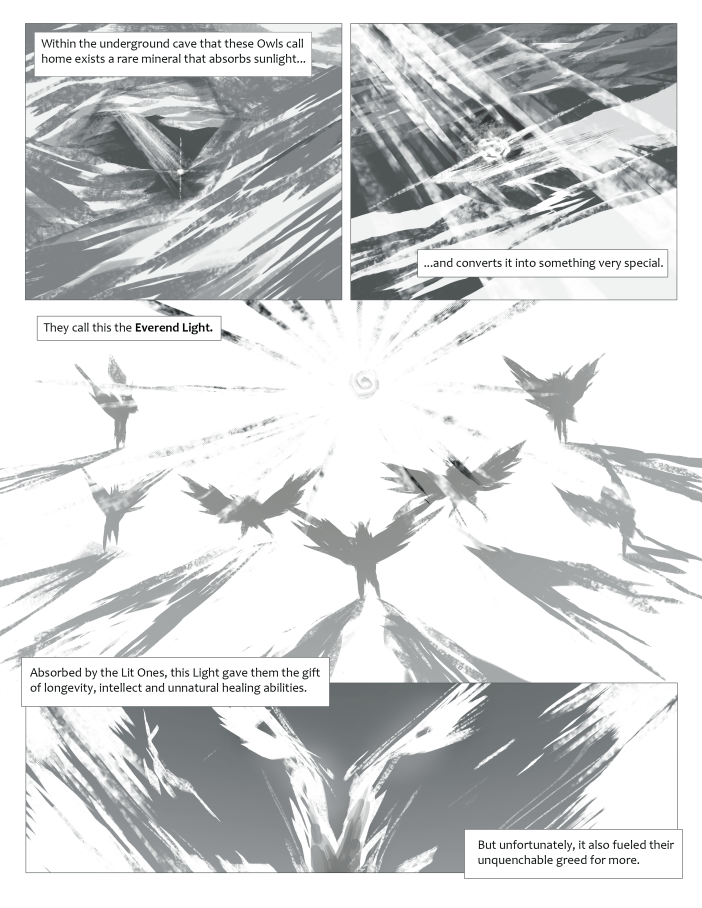
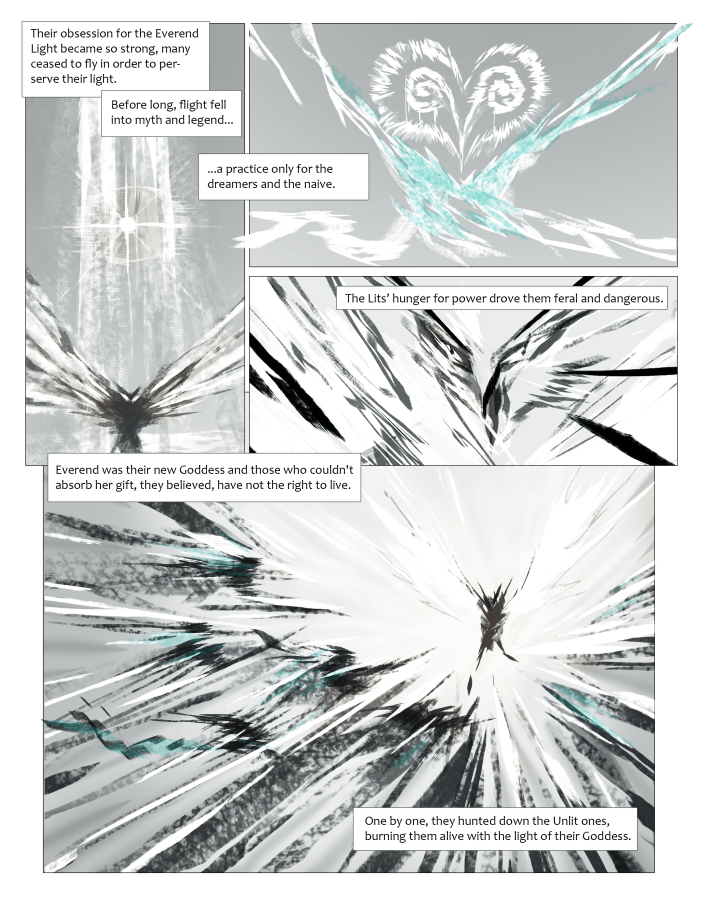
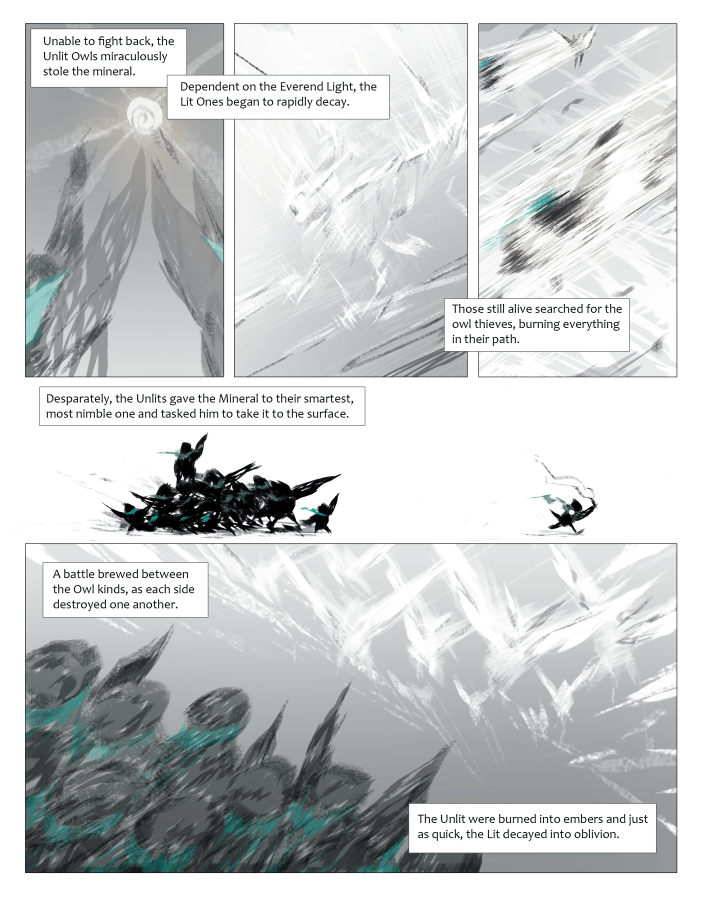
As the final Sprint rolls along, we are working twice as hard to polish Everend ready for the Game Launch on April 27. To prepare you all for the narrative of the game, here is the backstory of Everend!
I hope you enjoyed the brief backstory! To be continued in Everend!
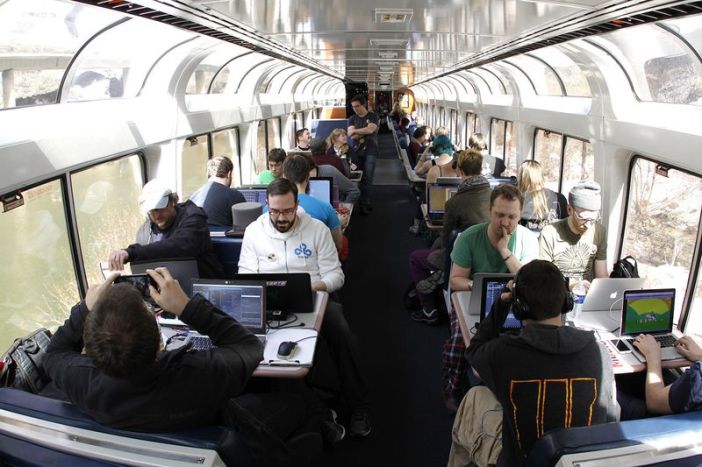
Last week several of our developers, including myself, were able to attend the 2016 Game Developers Conference. It was an excellent opportunity to promote the game and get feedback. Getting feedback from industry professionals and even some feedback from some unity representatives was extremely exiting.
Before the conference even started our art lead Emily Dillhunt was able to create a game during the train jam on the way to GDC. She even collaborated with developers from Campo Santo to make the game ‘Discharge’!
On Tuesday I was able to attend the ‘level design in a day’ workshop along with our lead designer Mitch Clayton. The workshop involved a series of talks that revolved around creating more intuitive, creative, and fun levels and puzzles. Later in the week some of our developers were able to visit the Unity offices where they were able to get some of that valuable feedback.
All of that, and it still only describes a slice of what we were able to get done at GDC. We were able to meet a lot of good people, do a lot of networking, as well as have a lot of fun. Most valuable of all, we were able to get a fresh perspective on our game. Beyond that we’re back from GDC and ready to get started on finishing the game!
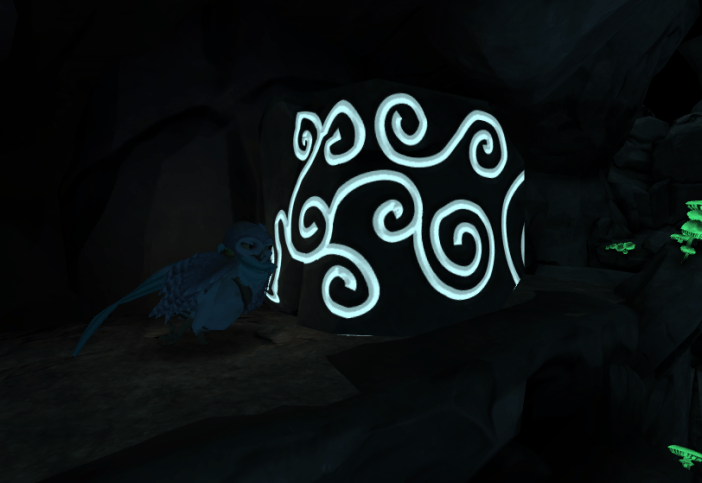
I am the lighting designer and one of the programmers of the team. I am going to talk to you about the lighting of Everend. I will walk you through the lighting from day one to the current development. Some of the sections that I will talk about are the baking process and the steps I take when baking the light for the game, some of the cheats I use to help keep the performance down while still keeping the lighting worthy of the game.
When we first started in the fall, we talked about the roles everyone would be doing. I have had almost eight years of experience in theatre lighting so I said that I would be interested in lighting and Emily our art lead said that the experience may be useful because lighting would be a big component of the game. At the time I was a little nervous; a programmer was about to step into the realm of artists, but I threw caution to the wind and spread my wings, then I jumped. I then remembered I am not Kaia and I do not have wings so there was that.
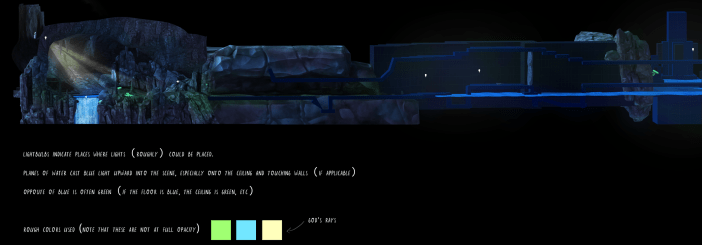
Having the experience in theatre was not going to guaranty that I would be able to do the things that we envisioned at that point. I spent the first few weeks working on tutorials and documentation about lighting in Unity, the engine we are using to make the game, after that I felt I had the tools necessary work in Unity. That brought up the next big question though, what should light look like in a cave? I wanted to make sure that the light was realistic looking and would interact with the art of the levels positively. The trip to crystal cave that the team did in the fall was a big help to that. It was such a big help that we wrote a blog post about that, you can find that here: https://thatowldevblog.com/2015/11/19/crystal-cave/. Taking what we gathered there we felt more confident about the lighting. As Mitch and Emily worked on building the levels I talked with them about what they wanted for lighting. After the first level was finished being boxed out and was starting to be set dressed I took some screen shots that Emily pasted together and started marking it with locations of lights and what she wanted those lights to do. This is what I was handed which I then used to place the lights in the game.
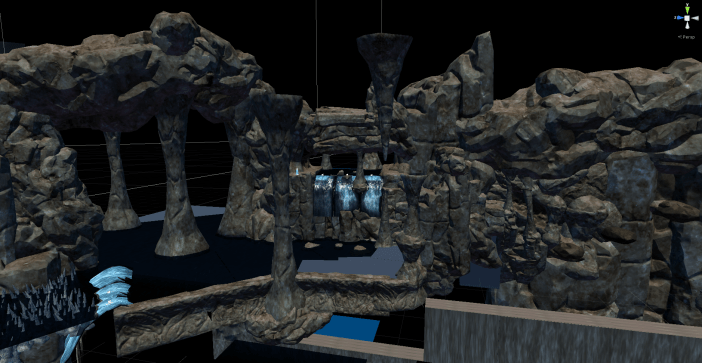
I started to experiment with a few different lighting settings including a shader setting called emission. Emission uses a map that is in greyscale which shows which sections emit light and which ones don’t, this saves on lights in the scene and are just as diverse as regular lights. One major thing that I determined would make the performance of the game faster was to bake out as many of the lights as I could before we built the game. Baking means that we take lights that are set to baked or mixed and use the light that they emit and shine and project it onto anything in the scene that is set as static, these are things that we are not expecting to move at all walls, floors, and ceilings are examples of this. Before baking and the placement of the lights we have this: After the placement of lights and baking those out we have this:One thing that you may be asking yourself is, what about Kaia? She moves around? Baking will not affect her, or will it? A cheat that allows me to get away with having most of the lights be set to baked is light probes. These probes grab the light that is shone on them and saves it as a small map. Those probes then communicate between their close neighbors and when a dynamic object moves through those probes the ones closest to it form a tetrahedron, a polyhedron composed of four triangular faces, and will apply the light data stored by those probes to the dynamic object. One big thing to keep in mind is that if those probes are not placed very close together or there is a major change in light between two probes which are not adequately placed it can cause slight problems with the dynamic object. When I place probes I have to make sure that I place enough probes in major changes of light to give the feel that the dynamic object is being properly affected by the lights. Here is a picture of the probes in the first area of the first level. The yellow spheres are the probes themselves the purple lines are the connections between those probes.Yeah that is a lot of probes but it is important that they are there, because without them Kaia looks like this.Now I know what you are thinking “that does not look too bad” but when you compare it to this.It looks a lot more realistic. Kaia looks like she is being affected by the sunlight and we are saving on performance because there are less dynamic lights in the scene. Here is a look at what it looks like in the scene view instead of the game view of Unity.
The yellow area is that tetrahedron that I was talking about earlier. You can see the greyish spheres that are in the area are those yellow spheres from earlier and they are showing how the lights are affecting them really well.
Now that I have rambled on for a bit I will talk about the actual baking process and the steps that I take to bake out the lights for a scene. In Unity there is a window for lighting with a large amount of settings. I am not going to go into detail about each individual setting but I will go into detail about a few of them. One of the big things I use to add color to the scene without using a lot of lights is the ambient source. I use a gradient of three colors that I get from Emily. I spent a few more weeks working on getting the settings for baked global illumination ironed out. The settings that I came up with allow me to quickly turn around the lighting and show Emily and Mitch what the scene looks like with lighting in. Here is photo of the quick turnaround lighting.In the baked GI section there are two settings that I do not have set when I do the quick turnaround they are very costly in the time department. The first of these is final gather to improve the quality of the light ray tracing is used at the last bounce that the light makes it adds to the visual quality significantly. Here is what that looks like.The second of the settings is ambient occlusion. Since the light will hit everything indiscriminately corners and indents will be lit just as much as the flat surfaces. This will determine how large the contrast is and how far those shadows will go out. Here is what that looks like. We are nearing the end don’t worry. Thanks for reading all the way through I hope that I shined a little light on how the lighting is done in the caves of Everend. Taking all the things I talked about in the last section combining the quick turnaround, the final gather, and the ambient occlusion into the game we are given this which is the final result of the game.
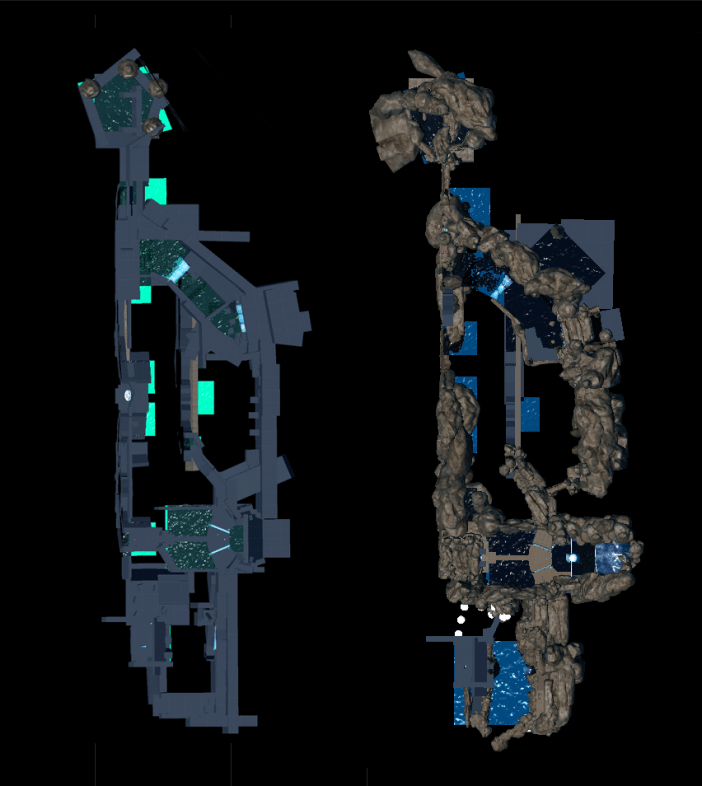
Level Design is a really important process in the development of a game. Without level design we would only have a pretty space to walk around in. It is much more than just drawing a map that looks cool. This isn’t solely the visual experience but is the way the map, puzzles, and visuals come together to create a cohesive picture. Level design is the process of creating the world that the player experiences. It takes a lot of work and iteration and as a team we have done much of that.
We start with discussing what game elements should be in each level. A list is created of all of the aspects that will make the level unique: the kinds of puzzles, what obstacles the player should come into contact with, as well as the visual aesthetic of each level. The visual aesthetic is extremely important. It tells us the basics of what we can and can’t do. For example, the water themed level should have a lot of puzzles that involve water and swimming, but should not include anything fire or lava related. This limits what we can do aesthetically and what we can do with puzzle design.
A very early example of going through each level and deciding the elements that will be included.
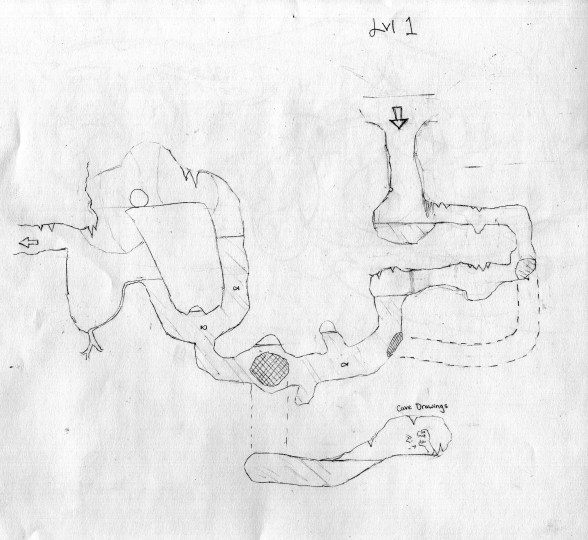
After the list of all of the elements that should be in each level is created, we begin drawing out maps. This allows us to think visually about the flow of the level design. Drawing out the maps helps us to begin designing the puzzles, thinking through the steps that make a puzzle fun but challenging. There needs to be a variety of puzzle difficulty. Some puzzles need to be difficult and others that the player can solve pretty easily. Additionally, we need to work on the flow and order of the game. Having important concepts introduced to the player in early levels is important so that he or she can successfully navigate more difficult levels later in the game. At the early stages there is no right or wrong design. Many of the best ideas come from the most random encounters.
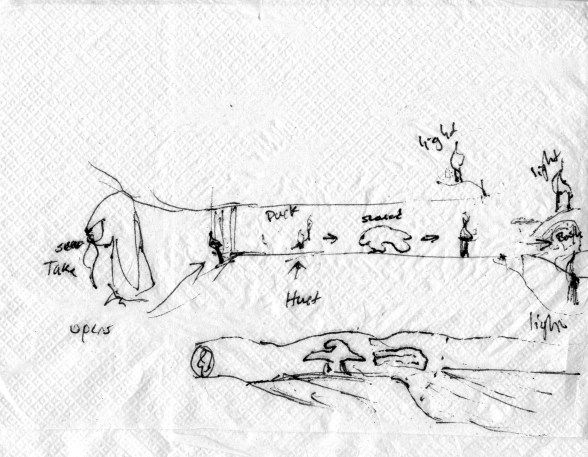
Great ideas can come about at any time hence this napkin drawing.Some early pencil level drawings of the water level.
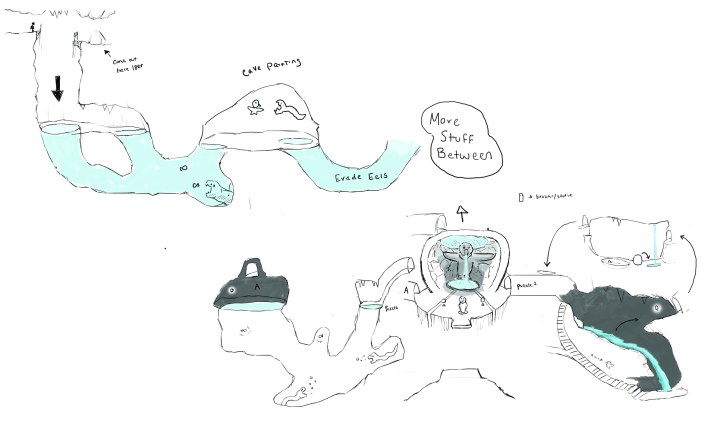
Our team comes together after coming up with much of the level design to look at the positives and negatives of each other’s ideas. Working as a group really helps the overall decisions making. Everyone sees things differently which allows for a lot of unique and interesting discussions which lead to better design overall.
Updated water level design after team discussion.
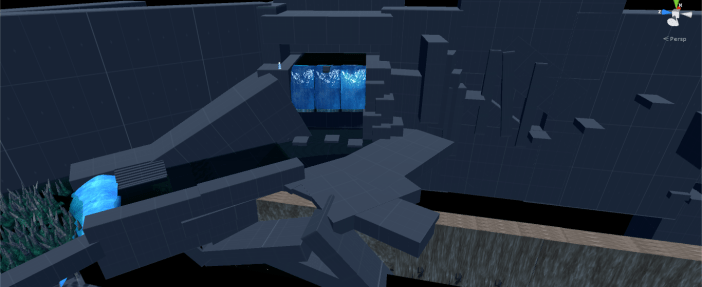
After we have a good idea for different puzzles we begin to build everything out in Unity. Gray boxing is the process of creating a level through the use of basic geometry. It lets us build prototypes of individual puzzles and whole levels that our team is able to play test. We want to make sure the gray box experience is what we want the actual experience to feel like. If a puzzle isn’t intuitive, fun, or working as intended, it will not work as fully functional play experience even if looks pretty. The gray box stage allows us to do lots of testing to refine our game before we start putting in tons of work to a level or area that might get cut from the final game.
At this point we go into each level and do a rough visual pass to make it feel similar to the rest of the game. The visual pass is the process of going through and replacing all of the gray boxes or in our case blue boxes with real assets that the art team has been working on.
This is a great example of gray boxing and first pass on set dressing. You can see the drastic difference between each screenshot.Top down view of the water level. Left: “Blue” Boxed. Right: First set dressing pass.
After the set dressing pass we push it on to our lighting guy to do an early lighting pass. The lighting pass is an early test of what the overall lighting of the game will look like. This allows the artist to have a better idea of what the space will look like while they do the final set dressing. Once the lighting pass is done we can go back into the space and really refine the visuals. We work to make each level feel unique but also have a cohesion across the game. This is when we introduce more of the individual models of specific pieces needed for each area. For us this includes owl statues, mushrooms, plants, and more.
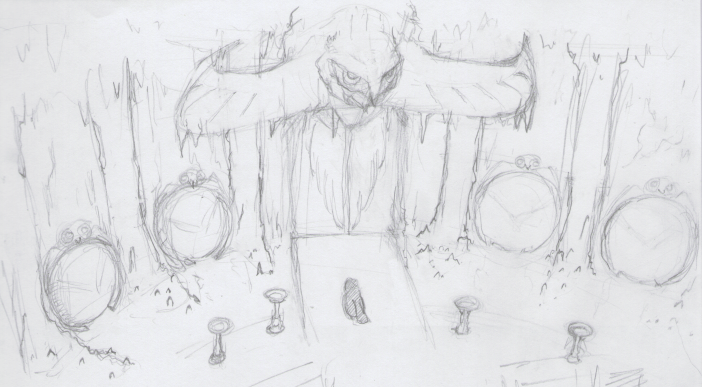
Our most recent challenge for level design has been reworking our temple level. The temple level is a large temple created by the ancient owl civilization. It is supposed to be grand but dilapidated. It is introduced early in the game and is where you access other levels. It has been a challenge to design this place both visually and mechanically. Originally, this space was supposed to be its own completely contained level. Our project scope was too large for the amount of time we had and we had to make compromises. In order to keep the most important area of our game, without having to cut an entire space, we decided to do some massive changes to how temple level would work. Instead of being complete level it is now a hub space. This allows us to keep the space for use as the end level of the game without having to change much of the original design.
Above is an early design for what the space was originally supposed to look like. Before the redesign you were supposed to do a small puzzle that returns you to an environment similar to each of the past levels you encountered and offers you a chance to further refine your understanding of the puzzle in each area. After completing all of them you would unlock the entrance to the temple.
Thanks for reading and I hoped you learned a lot about how we do our design. Also above is a sneak peak of what our temple hub might be looking like.
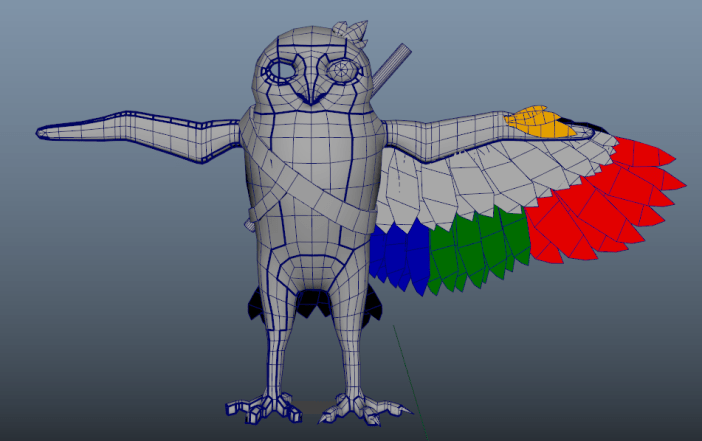
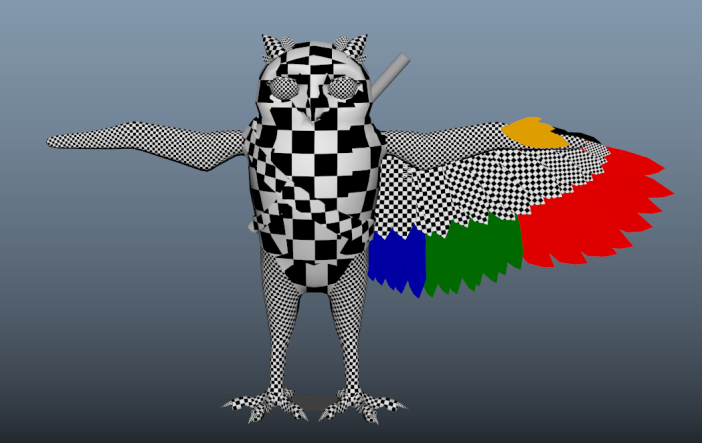
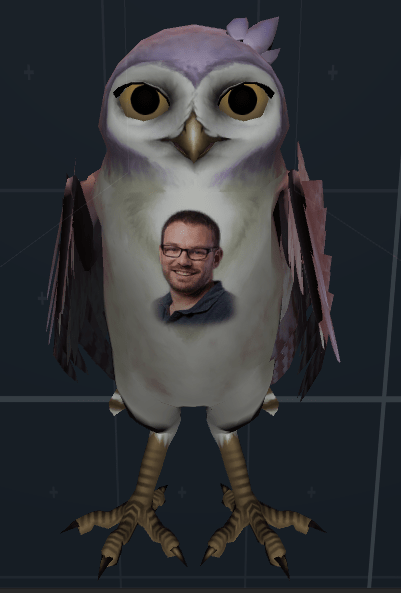
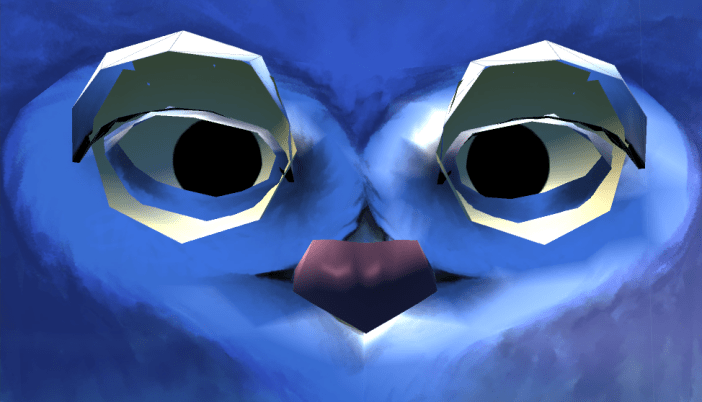
It’s not all fun in games during the development process: while the majority of the time things run smoothly, every development team has it’s share of bugs and bloopers. We’d like to share ours with you, in the hopes you’ll get a chuckle out of it! Now that you know all of the tasks and people involved in making Everend fully realized, it’s time to show you some of the things that can go awry along all parts of the pipeline. Equal parts hilarious and frustrating, we hope you enjoy some of the unexpected, confusing, and downright weird issues our coders and artists have to iron out before the game is released.
There was that one time Kaia was a robot:
And then afterward a strange, checkered alien.
After that, her textures weren’t quite right…
But that’s okay, we all know true beauty is on the inside! …Right?
Then Kaia was in motion which created it’s own set of problems, like her unquenchable love for river dancing…
As well as her tendency to occasionally leave some pretty important things behind.
We’re making a horror game now I think,
And I’m not even going to pretend I know what’s going on here.
All in all, bloopers and bugs aside… Development is running smoothly and we’re well on our way to a beautiful, exciting final product. We’ve had our share of laughs and groans along the way, but it’s all part of the creative process. After all, nothing ever good came without a little dancing, suddenly turning into a robot, or without leaving important facial features behind. Or something like that.
We look forward to having you play! Kaia does too.
Water plays an important visual role in Everend. There are plenty of really nice looking shaders already made, but to get the kind of look that cave water has we needed our own. We didn’t need anything too complicated so our water includes only the basics like distortion, waves made up of normal maps, and color change based on water depth.
Waves
To get the wave effect we simply used two normal maps scrolling in opposite directions. The immediate effect is an invisible plane, but with the addition of a specular reflection the waves start to show when a light is reflecting off of them.
Refraction
The water surface at this point is still mostly invisible except for the specular reflection so we added a distortion effect to the water. The refraction part of the shader uses the same normals as the specular reflection. To get this effect we used Unity’s GrabPass to grab what would have been displayed and grab either a pixel offset to the current one based on the color of the normal map. The method to create the distortion is fairly straightforward. The shader needs to grab the red and green color of the normal texture which are between 0 and 1 and transform the values so they fall between -1 and 1. Then it needs to get the position of the current pixel and add the offset to it. Finally use that value as the location of a pixel on the GrabPass texture and return its color. As long as the normal map has smooth transitions so will the distortion. The intensity of the effect can be altered by multiplying the transformed red and green values, and if you pause the scrolling normals then the effect works well for ice.
Depth
The last two effects are both based on camera depth. The surface of the water should remain clear, but as its depth increases the color should change and the water get murky. This effect can be achieved by getting the distance between the water plane and the pond bottom and linearly interpolating between clear and colored based on the difference. To get the distance to the surface of the water the shader should multiply the vertex position by the model view projection matrix, and then in the fragment function all you need to do is grab the positions z value. To get the Depth of the pond floor you just need the LinearEyeDepth of the camera depth texture. After that subtract the plane depth from the floor depth and you have the difference (You can divide this by a value that will then control how deep the color starts to change). Then linearly interpolate between your surface color and underwater color based on the difference and return the color.


 This is what I was handed which I then used to place the lights in the game.
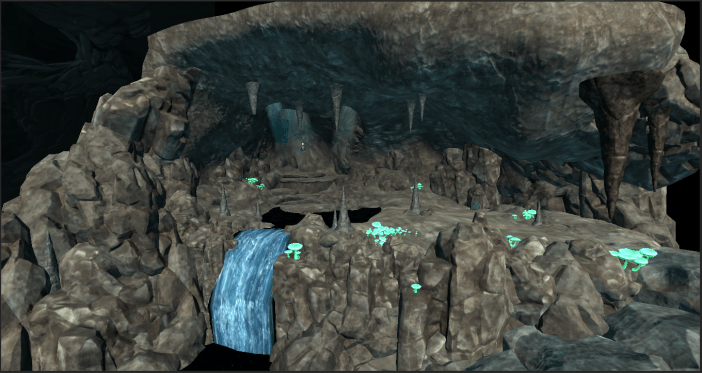 After the placement of lights and baking those out we have this:
 One thing that you may be asking yourself is, what about Kaia? She moves around? Baking will not affect her, or will it? A cheat that allows me to get away with having most of the lights be set to baked is light probes. These probes grab the light that is shone on them and saves it as a small map. Those probes then communicate between their close neighbors and when a dynamic object moves through those probes the ones closest to it form a tetrahedron, a polyhedron composed of four triangular faces, and will apply the light data stored by those probes to the dynamic object. One big thing to keep in mind is that if those probes are not placed very close together or there is a major change in light between two probes which are not adequately placed it can cause slight problems with the dynamic object. When I place probes I have to make sure that I place enough probes in major changes of light to give the feel that the dynamic object is being properly affected by the lights. Here is a picture of the probes in the first area of the first level. The yellow spheres are the probes themselves the purple lines are the connections between those probes.
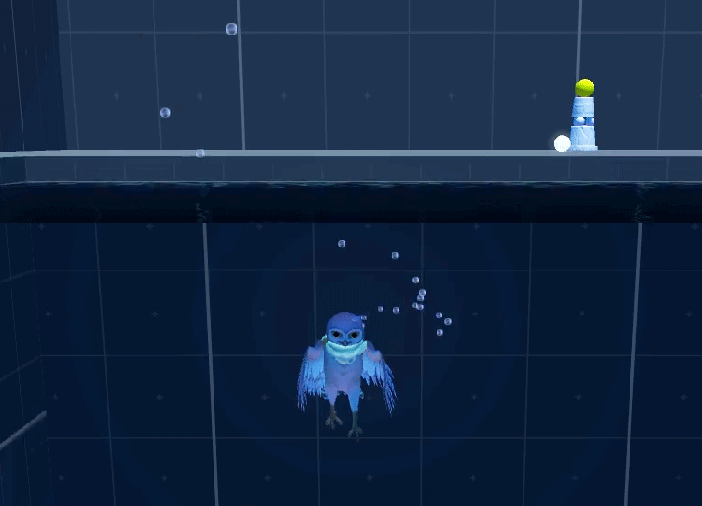
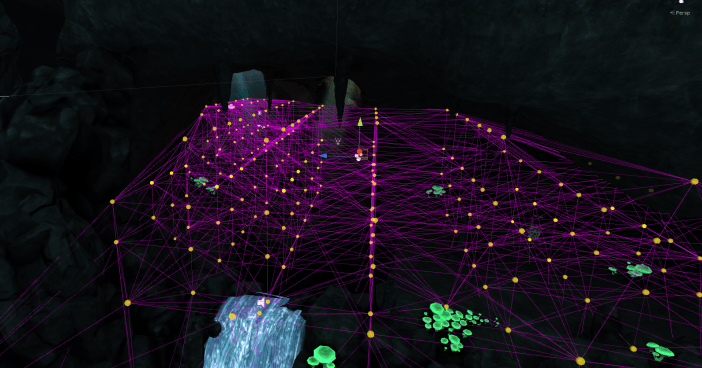 Yeah that is a lot of probes but it is important that they are there, because without them Kaia looks like this.
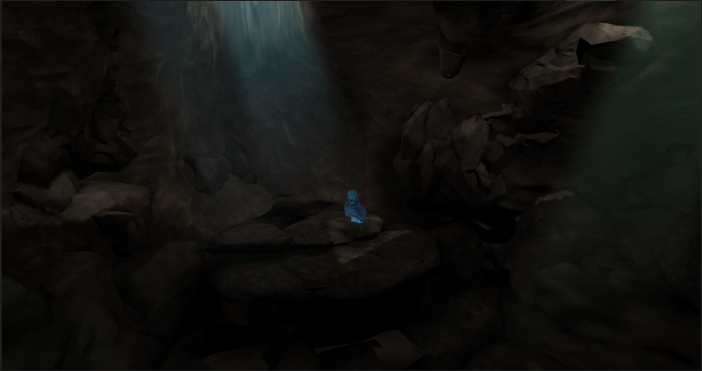 Now I know what you are thinking “that does not look too bad” but when you compare it to this.
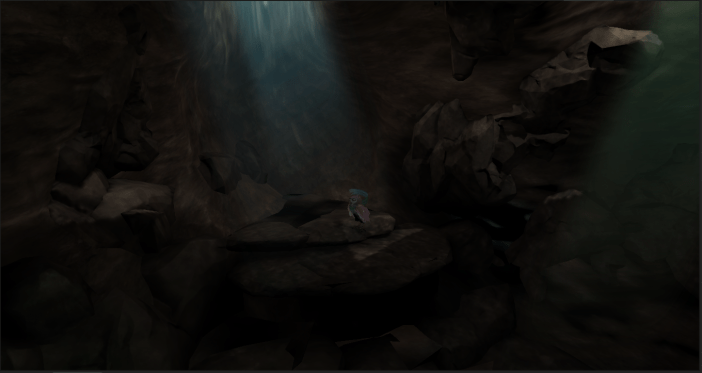 It looks a lot more realistic. Kaia looks like she is being affected by the sunlight and we are saving on performance because there are less dynamic lights in the scene. Here is a look at what it looks like in the scene view instead of the game view of Unity.
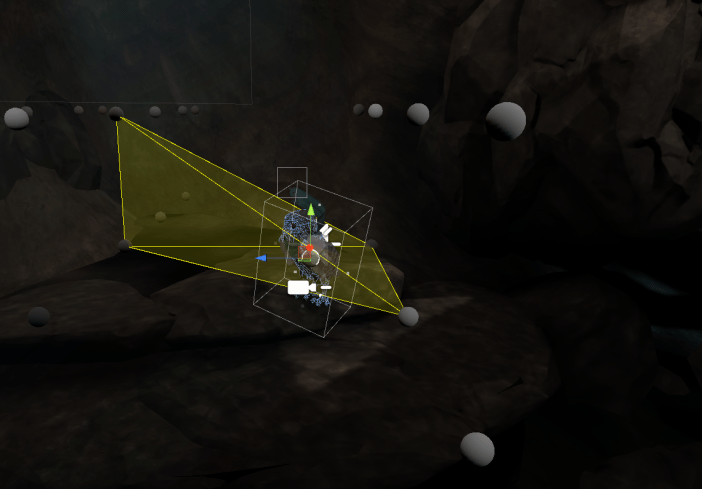
 The second of the settings is ambient occlusion. Since the light will hit everything indiscriminately corners and indents will be lit just as much as the flat surfaces. This will determine how large the contrast is and how far those shadows will go out. Here is what that looks like.
  We are nearing the end don’t worry. Thanks for reading all the way through I hope that I shined a little light on how the lighting is done in the caves of Everend. Taking all the things I talked about in the last section combining the quick turnaround, the final gather, and the ambient occlusion into the game we are given this which is the final result of the game.